
Developing a feature can be messy: unclear requirements, refactoring, peer feedback, and typos. These events are unexpected, and your git history does not need to reflect the actual order they occurred during feature implementation.
Optibus is a SaaS company powering complex transit operations in 2,000+ cities around the world. We help these cities plan and schedule the movement of vehicles and drivers to improve the quality and reliability of transit service, and to make operations more efficient. Our development team is also distributed around the world. Clear communication of code changes is essential for efficient asynchronous interactions between developers, and the git history is a useful resource to achieve that.
In this post, I’ll demonstrate how I used git to manipulate the history of a recent feature I worked on, so it did not reflect the back-and-forth I went through while developing it.
I’ll cover the following topics:
- Reordering commits
- Committing changes incrementally
- Merging commits
- Getting distractions out of the way
- Deleting commits
- Splitting commits
What I’m going to demonstrate is an example of what is possible for those who want to be able to manipulate the git history to their needs.
Reordering commits
My task began as a handover of my colleague’s work. His experience was required on other tasks, and we decided I should continue what he had left off. Part of the work was done and did not require changes. The other part was missing or implemented as a proof of concept (POC). My task was to develop the missing functionality and refactor the POC into production code.
When I start to work on a feature, I like to store the hash of the commit that my branch was forked off to a shell variable called bc (base commit). This variable is used as a reference point when I manipulate the git history as I progress in my work.
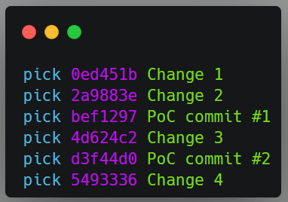
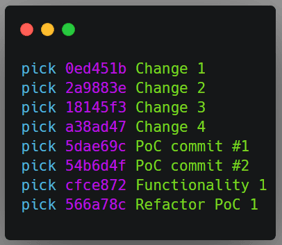
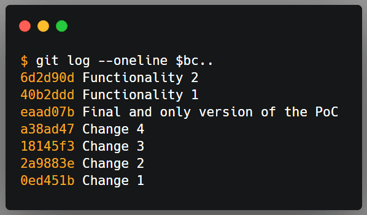
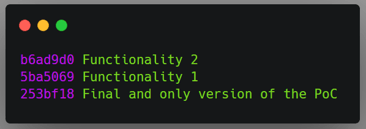
As I looked through my colleague’s history to identify where he forked his branch, I noticed that the commits for the POC were mixed with commits for the code that did not require changes.
Since I was about to change the code for the POC, I moved its commits to the top of the history using the git rebase --interactive $bc command, so I could focus on the history manipulation from this point onwards.
 |
 |
Top left: original order of commits in the rebase command. Top right: order of commits defined by me. Bottom: The git history after the rebase command.
Committing incrementally
I find smaller commits easier to be manipulated, so I like to commit my changes in small increments. When I have small changes this is easy, as all of them are staged and committed together.
When my work requires bigger changes, I like to focus on them, not on commits. So I work until a point where I’m satisfied, and then I use git add --patch. This command is very powerful as it lets me choose which hunks of changes are staged and which are not. It is also a good opportunity to review what I have been doing.
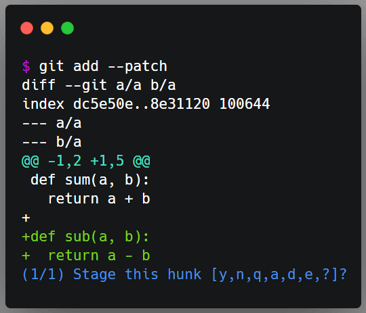
Example of git add --patch.
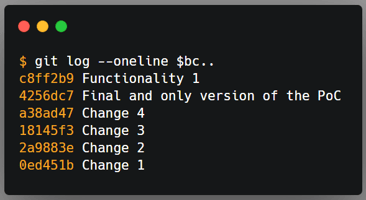
I continued my task, and by the time I was finished, I had a few new commits. Some of them refactored the POC, and some of them created new functionality.
These commits put my git history in a state I wasn’t comfortable with. Why should I keep in history refactoring changes for code that was introduced in the same branch? What value does it add for the reviewer or future readers?
Merging commits
For me, the answer was none. So I wanted to merge all the code related to the POC into a single commit. This way, the history would not even mention a POC and the functionality would be presented in its final form.
Git provides two ways to merge commits: squash and fixup, both parts of the rebase command. The difference between them is that squash allows you to tweak the commit message, while fixup maintains the message of the first commit.
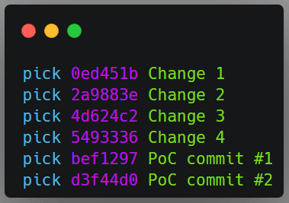
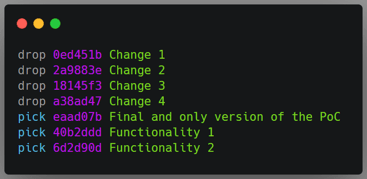
Once again, I ran git rebase --interactive $bc and then moved the commits I
wanted merged, and marked them with the squash flag.
However, doing this many times a day is time-consuming and distracting. If you are committing a change that you know will be merged to another commit, git can automate the process so you can focus on your work and not on the rebase process. Let’s see how.
 |
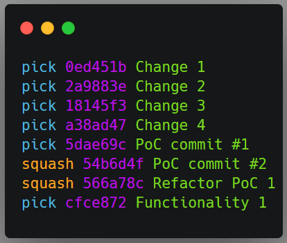 |
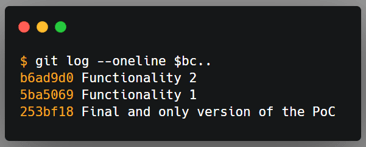
Top left: original order of commits in the rebase command. Top right: order of commits defined by me. Bottom: The git history after the rebase command.
Getting distractions out of the way
As my work continued, now implementing new functionality, I noticed many mistakes from my previous commits. As I mentioned before, I didn’t think the fixes for these mistakes deserved their own commits in the git history, but it was not the time to do a rebase process, as I didn’t want to break the flow.
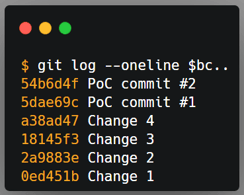
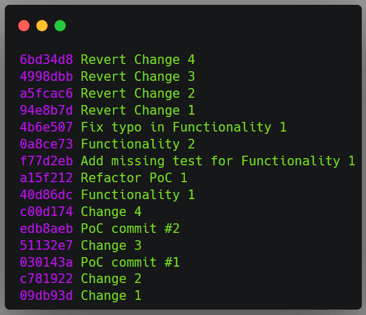
Git provides the --squash and --fixup flags for the git commit command, which expects the commit hash that the changes will be merged to when used with these flags. In the end, you will have unwanted commits in the history, but git will know the commits to merge them with. Once you run git rebase --interactive --autosquash $bc, the rebase command will be set up automatically, and you just need to review it.
I usually use the --fixup flag for commits that do not require context, like fixing typos or adding missing tests. I use the --squash flag when the change has a context that I want in the original commit’s message, and I’m afraid to forget, like when adding a missing method or fixing a broken test, so I just type anything and edit it during the rebase process.

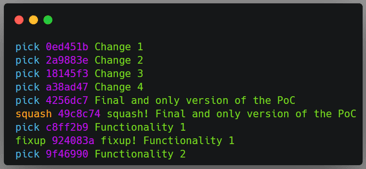
Top: original order of commits. Middle: order of commits automatically defined by the rebase command with the --autosquash flag. Bottom: The git history after the rebase command.
Deleting commits
When I was ready to submit my changes to review, my colleague and I decided that only my work should be merged. He wanted to do some more work on his part, and there was no reason for me to wait for him to merge my changes as both works were somewhat independent.
All I needed to do was to drop his commits and keep mine. I ran the rebase command and marked all of his commits with the drop command, and continued the rebase.
Top: My manual changes to tell the rebase command which commits should be dropped. Bottom: The git history after the rebase command.
Splitting commits
I decided to review my work one more time and noticed that some unrelated changes were committed together. I wanted them to each have their own commit.
This required a bit more work. The way I did this was to run the rebase command and mark the commit I wanted to split with the edit command. Once the rebase stopped at this commit I ran a git reset HEAD^, committed each change at a time, staging them with git add --patch, and continued the rebase.
Wrap up
In the end, I was satisfied with my work and how its history ended up: it was straightforward and granular. It was also nothing like the actual series of events I went through.
As I demonstrated, the rebase command is very powerful and, together with the add, commit and reset commands, can be used to efficiently craft any git history you want as you develop your feature or after you have developed it.
Resources
My intention with this post is to show what is possible with concrete examples of when to use these commands. But, to keep it brief, I didn’t talk about conflict resolution or the inner workings of the rebase command. These are important things to know about when using the command. To learn more about the rebase command and the other commands, I invite you to take a look at their documentation below:


%20(2).png)
.png)